How to Select and Buy a Chinese Cleaver
Before Buying a Chinese Cleaver
When it comes to cutting utensil meant for all purposes, the Chinese cleaver is of no match and none could compare or beat it. Practically, all parts of the knife can be put to great use in one way or another. The edge with the sharp blade is for cutting while the other blunter side is useful for pounding and tenderizing meat. Turning the cleaver on its side and it will be a great smashing tool for ginger and garlic. Besides, it can even be used to transfer ingredients that have been cut from the cutting board to the wok for cooking. The cleaver also comes with additional bonus of the handle's flat end which substitutes nicely as a pestle when required. It is the blade that matters Cleavers blades were traditionally made of carbon steel. However, carbon steel is a metal that is prone to rust and that is the problem of using carbon steel as the material. Besides, there will also be a tendency of having a metallic taste in the food. Today, well-known cookbook authors recommend using cleaver made of stainless steel, or at least a combination of stainless steel and carbon steel. Cleaver or Knife? Unlike the cleavers of western butcher's, Chinese cleaver should not be used to chop bones even though they look similar. To chop bones, heavier cleavers are required for this job. Instead, the main function of those Chinese Chef's Knife which is also known as a lighter cleavers are meant for slicing vegetables and meat. If you use the lighter cleavers to chop bones, you run the risk of damaging the blade. If you're not sure of the types of cleaver you have at home, just check at the store that you made that purchase. How to choose a cleaver Check with a few experts on their most favorite cleaver and the responses will come back in different answers. Just like the flavors of ice cream, selecting a cleaver is rather a personal preference. The most crucial is to find a well made cleaver. Martin Yan, Dexter and J.A. Henckels are amongst some of the better brand names. In addition, it is also very important when it comes to your level of comfort in handling the cleaver. It should not be too heavy but at the same time feel solid. If you felt your arms to be strained when handling the cleaver, then choose another one. Preparing meals should not be a hard work. Sharpening the cleaver It is essential to sharpen the blade of the cleaver regularly. If you attempt to use a dull knife, you will tend to use more forces which can result in unwanted accidents in the kitchen. To sharpen a cleaver, there are numerous ways to do so. You can use a smooth sandstone to sharpen or using a sharpening steel for the job. Sharpening steels realign the cleaver's blade edge at the molecular level instead of removing the metals. Maintenance and care for cleavers Protecting the cleaver's blade is the utmost important thing when it comes to storing or cleaning it. To avoid the risk of damaging it, cleavers ought to be kept in proper knife block. When cleaning a cleaver, the best way is to wash by hand in soapy and warm water. To ensure proper storage, always dry the cleaver thoroughly as stainless steel is not completely rustproof. And always clean the cleaver's blade immediately after you have used it to work with acidic ingredients like tomatoes.
14:55:25 on 05/22/13
by Webmaster -
Cooking Guide -
Great kitchen gadgets that do more than just cooking
Home cooked meals are always the best when it comes to eating right and having healthy foods. Preparing and cooking your own foods can be quite an empowering experience by itself. You could make smarter choices with all the fresh ingredients, controlling the amount of oil and fats that goes into your food, as well as the ability to select leaner cuts of meat. With these, it will assist you in gearing towards a healthier lifestyle and better diet.
Never shy away from your own kitchen as cooking a simple pasta dish or making a salad do not require rocket science. And if you need more help to ensure that making your own meals truly work for you, then you should consider investing in some of these great kitchen gadgets if you have not already done so. A good and useful zester This is one tool that makes it the easiest way to add freshness and great flavor to any food you cook. The champion of zesting especially for lemons, is the celebrity chef Jamie Oliver who is great at it. Citrus zest, regardless of lime, lemon, grapefruit or even orange contains lots of healthy nutrients too. Medical studies have proven that these citrus fruits could help to lower our cholesterol, serum triglycerides that cause diabetes, and also contain a high levels of antioxidants. Use them on mashed potatoes, salad or roasted cauliflower. A humble everyday kettle In some coffee-obsessed countries, it may be quite difficult to switch from coffee to tea. However, drinking simple cups of green tea everyday can help you to slow down the effects of aging due to its antioxidants. There have been medical researches done and many benefits of drinking tea have been documented, such as protecting against cancers, prevention of cardiovascular diseases, burn extra calories and aging gracefully. Use a simple kettle to prepare black tea which can increased your energy and immune system, greet tea for anti-aging and the least processed, as well as rooibos which helps to support respiratory health and liver. Grilling Tools Not everyone owns an outdoor barbeque set, but keeping some grilling tools would definitely be handy. Nowadays, grilling can be done indoor using electric griddles or even a stove top grilling pans. The secret to having a leaner meal is to ensure that you fire up that griddle which can limit the amount of fats and oil used. To put it simply, it is healthier to grill. And, grilling does not stop with just vegetables and meat. Try grilling fruits like mangoes, pineapples and peaches for desserts by adding a sprinkle of cinnamon with a little brown sugar. Then savor them drizzled with honey and a dollop of sour cream. Container for food storage Food containers are a must and important to have in every home. Ensure those food containers are airtight, and preferably made of high food grade plastic, or glass. They could help to prevent any potential contamination on your food as well as to keep them fresher longer. Once you've got those food containers sorted out, they can be utilized to pre-prepare your meals ahead of a busy week. You can just reheat your food instead of relying on those microwaveable dinners and fast food. Casseroles, roasted chicken and soups are great options to prepare and cook ahead.
01:41:46 on 05/21/13
by Webmaster -
Cooking Guide -
How to select shellfishWhat are the ways to select shellfish?Abalone. Abalone is expensive because the supply is limited. These large mollusks are found mostly in the waters off California and northern Mexico. Unlike the other mollusks discussed, abalone have only one shell. Most of the animal consists of a massive, muscular foot. Only abalone with meat weighing at least 1/4. pound may be legally harvested; some extremely large abalone yield as much as 3 pounds. The strict regulations governing the harvesting of wild abalone have led to farm-raised abalone, which are largely harvested in California and Hawaii. Lobsters. Lobsters are the largest of the crustaceans. They are mainly purchased as Northern (or Maine) lobster, or spiny or rock lobster varieties. Gourmet cooks prefer the female lobster for its finer flavor and because it contains "coral," or lobster roe, which is considered a delicacy When cooked, the roe turns from dark green to red and is often used to color a sauce or served alone as a garnish. Another delicacy, found in both male and female lobsters, is the pale green liver, known as tomalley. The majority of the meat from a lobster is in the tail, but there is also some in the claws of the Maine lobster. Lobsters are right-handed or left-handed, as indicated by which claw is the larger, and although the larger claw has more meat, that from the smaller claw is sweeter and more tender. Northern lobsters with one or both claws missing are sometimes sold as "culls." They are less expensive and attractive to the buyer interested only in the tail meat. Unless they are canned or frozen, lobsters must remain alive until cooked, at which point their natural dark blue-gray or greenish color turns deep orange or red. Shrimp. The tail harbors most of the meat in shrimp. They are sold, headless, in either the raw shell-on (green shrimp), cooked shell-on, or cooked and peeled form. All three forms come both fresh and frozen, but the majority of shrimp are frozen. When shrimp are bought in their shells, they must first be peeled. The next step, if the shrimp are medium or large, is to devein them, which involves removing the dark-colored "sand vein" or intestine that runs along the shrimp's back. The "sand vein" is usually left in small shrimp, where it is undetectable and does not contribute to a gritty, muddy taste. After cleaning, the shrimp are dried by pressing them between paper towels to absorb as much moisture as possible. Before they are cooked, shrimp are somewhat grayish green, but they turn dark pink to borderline red when heated. Shrimp are available in small, medium, large medium, large, and jumbo sizes. They are purchased according to "count per pound," which varies depending on the region, but obviously the smaller the shrimp, the higher the count per pound. Serving size averages 1/3 to 1/2 pound for headless, unpeeled shrimp or 1/4 to 1/3 pound for peeled and deveined shrimp. The largest jumbo-sized shrimp are frequently misnamed prawns, but true prawns have lobster-like pincer claws and are otherwise different from shrimp. Another shrimp-related North American misnomer is the use of the word scampi for describing large broiled shrimp seasoned with butter and garlic. Canned Shrimp. Glass-like beads are sometimes found in canned shrimp, but they are completely harmless. They are formed during canning, specifically under the high heats of sterilization. Called struvite crystals, they consist of magnesium-ammonium phosphate compounds that form when the magnesium from sea water combines with the ammonia that is produced during heating of the shellfish's natural protein. Phosphate treatment prevents struvite crystal formation due to the phosphates binding with the magnesium. Struvite crystals can be crushed to a powder by a fingernail or dissolved by boiling for a few minutes in the weak acid of lemon juice or vinegar. Crab. The majority of meat in a crab is found in its claws and legs. The four top commercially harvested crabs are the blue crab from the Atlantic and Gulf coasts, stone crabs from Florida, Dungeness crabs from the Pacific coast, and, most expensive, king crabs from the northern Pacific waters. Soft-shelled blue crabs are considered a delicacy, particularly on the east coast. These crabs are caught while molting, a process during which they shed their shell and have a soft exterior until the new surface is completely hardened. The process may take several days, during which time the crab is more vulnerable to predators, especially two-legged ones such as birds and humans. Canned Crab. Canned crab may have a blue tint. This is caused by copper in the crab's blood combining with the ammonia in its flesh. Although the color may appear unappetizing, it is completely harmless. Crayfish. Either referred to as crawdads, crayfish, or crawfish, these small crustaceans average 4 ounces in weight. Crayfish looks similar to lobsters but however, they are smaller, and their first pair of walking legs do not develop into huge, flesh-rich claws. Only their tails serve as a source of meat. They are found mainly as a food source in freshwater streams and ponds of the southeastern United States, especially Louisiana. Crayfish are sold both head-on and tails only, fresh and frozen.
15:12:48 on 10/08/12
by Webmaster -
Cooking Guide -
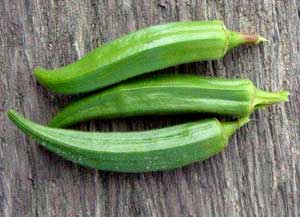
Okra Health Benefits
Okra health benefits have gained a consumers worldwide recognition as a healthy food. This vegetable aids in promoting a stronger and denser bones as it contains calcium besides being rather low in calorie. It also contains zinc which could speed up the process of healing of any injuries in our body.
 Okra has a wide varieties of essential minerals and vitamins that are beneficial to our body and health. Some of the more notable vitamins found within the okra health benefits are vitamin K which is essential for a healthy clotting of blood, vitamin C to strengthens the immune system which enables our body to resist colds and other common ailments. Besides, okra is also rich in Vitamin A, iron and many other useful minerals for our body. Compared with other fresh vegetables in terms of nutrients, okra has a high nutritional value. Okra has a wide varieties of essential minerals and vitamins that are beneficial to our body and health. Some of the more notable vitamins found within the okra health benefits are vitamin K which is essential for a healthy clotting of blood, vitamin C to strengthens the immune system which enables our body to resist colds and other common ailments. Besides, okra is also rich in Vitamin A, iron and many other useful minerals for our body. Compared with other fresh vegetables in terms of nutrients, okra has a high nutritional value.The flavonoids contained in okra are known to fight lung cancer as well as benefiting for the teeth as it makes them strong and protected against cavities. That way, it makes our teeth last longer. Okra aids in digestion One of the health benefits of okra is in aiding the smooth functioning of our digestive process which happened to be very crucial for our body to function properly. It is because of the soluble fiber which are found in abundance in okra. This soluble fiber assist the digestive system and ensure that we do not constipate but to have a regular bowel movement. These soluble fibers functions by absorbing water and thus protecting us from a constipation condition. Okra for a healthy hair When it comes to healthier hair, okra definitely has the health benefits as it can add volume to hair as well as adding bounce. All that is needed to achieve it is to cut the okra horizontally, and then boil until the content is slimy. Let it cool and then add a couple of drops of lemon to it. Then just wash your hair as usual. When it comes to the last rinse use this mixture. Ensure that all your hair are covered evenly. Your hair will then be able to achieve more volume and a little more bounce will be added to it. With all these okra health benefits, it is a surprise that this particular vegetable does not receive much publicity. Health Benefits of Okra There are many health benefits when it comes to okra and one of the benefit is that it helps to maintain our body's cholesterol level at the correct level. Okra is also crucial in protecting from cataract as well as alleviating the treatment process. It is strongly recommended for protecting the nervous system which actually can minimize depression, anxiety, and weakness. Storing of Okra Okra should be stored in a refrigerator and could last for up to 5 days. If kept in normal temperature, it can only last for just a few days. By adding okra into your regular diet, it can enhance your intake of vitamin A and at the same time improves healing process. As such, okra should be incorporated into our daily meals regularly in order to strengthen the colon. The okra seeds contained unsaturated fats including oleic acid, besides glutathione which is a protein produced naturally in the human body. This protein could prevent bacteria and germs in our body which otherwise would cause cancers and other serious ailments to us. Okra for pregnancy and childbirth The folates found in okra can help in childbirth as well as provides a healthy pregnancy. It can also assist in reducing some birth defect risks. It is highly recommended for women to take okra regularly prior to pregnancy for their own health benefits as well as for their own babies. By decreasing the likelihood of complications while being pregnant and birth to having a healthy newborn, okra health benefits are enormous. Okra Recipes Okra is a very common vegetable used when preparing food which includes gumbo and also other southern region food. It is often used in Indian and Mid Eastern delicacies. Okra is also referred to as ladies' fingertips simply because of the unique shape. When cooked the right way, it produces a sticky liquid which may be used to thicken braised dishes. Though the name may be unusual and you will probably be inclined to pass it by and opt for a more common veggies, give okra a try. Clearly, okra health benefits are immense and it may be included easily into any of our meals.
12:33:48 on 09/15/12
by Webmaster -
Food, Health and Fitness -
How to Sharpen Your Cooking Skills And Satisfy Your Taste Buds
Everyone can learn how to cook. Can you shop and follow directions? Is your kitchen stocked with the basic cooking utensils necessary? If you have the ability to follow the steps listed, you too can cook. These tips are here to help you improve your cooking skills and prepare great dishes.
Be open-minded about how you cook and serve your oysters. Oysters can be prepared in multiple ways even though they are typically eaten on the half shell with a tad of lemon juice. Take opened oysters in shells and place them on broiler pans; cover them with a bit of cream. Add some cheese and pepper on top, and cook until you see the liquid churning. Another option is to saute the oysters. Just drop them in some seasoned flour, then fry them in butter until they turn golden- about 2 minutes. Try baking the oysters within their shells. Start by placing a casserole dish filled with your oysters, cover them with butter and breadcrumbs, and then bake them in the oven for about five minutes at 425 degrees. Once the butter begins to bubble, enjoy them hot alongside some crusty bread. Dark, leafy greens have tons of healthy nutrients, but they can be tedious to prepare. Removal of the tough stems may take a long time. It's much easier to just fold the leaf along the stem and then break it off. Or you could use a knife and easily cut out the steam from a folded leaf. The unfolded leaf will be intact but stem-free. If your time is short when making a roast, speed up the process by leaving in the bone while cooking. If you leave the bone in, the meat will cook quicker. This is due to the fact that once the bone is heated it will help cook your meat from the inside out. Before serving the roast, simply cut the meat from the bone. If you're cooking in a nonstick pan, use a spatula made from nylon, rubber, or silicone. Harder utensils, such as metal or wooden ones, can scratch or gouge the nonstick coating, reducing the effectiveness of the pan, and potentially allowing the coating to flake into your food. If the protective coat of your dishes are flaking, it might end up poisoning your food. Layer salads so that juicier ingredients are on the bottom and crisp ingredients are on the top. Put the juiciest ingredients like tomatoes on the bottom, then put the lettuce and other ingredients that wilt easily on top. A fun spice to experiment with is saffron. Saffron lends a sunny flavor not available from other sources. Saffron is a delightful ancient herb. It is incredibly expensive due to its popularity. Replace your spices twice a year. Often, spices that have sat upon the shelf for a long period of time lose their pungency. If you purchase a new spice but doubt you can use it before the flavor dries up, share some of it with a fellow cook. You need to stay organized when you are cooking, so that you can be sure the food is as great as it can be and that nothing burns. Having an organized cooking area will ensure that you are productive when cooking. Unorganized cooking stations may mean you lose money and valuable food that is better suited to eating. Get the right kind of potatoes for the recipe you select. Waxy, mealy, and all-purpose are the three main classes of potato. Potatoes that are considered mealy are good for mashing because of their dry consistency. The russet is a common type of mealy potato. Yukon-gold are all-purpose potatoes that can work with any dish. Potatoes that are waxy hold their shape nicely, and are good for boiling and steaming. The most prevalent waxy potato varieties are red or regular white potatoes. Do not throw away the product of your hard work. Mix one tablespoon of starch and two tablespoons of water. Thicken your sauce by stirring the mixture into the simmering liquid. Be sure to gradually stir in the solution, and frequently stir the sauce so that it does not become too thick. If you want the cooking process to be both faster and easier, prepare as much as you can ahead of time. Browse through your recipes and see what parts can be prepared early, without fear of spoiling. There is a lot of preparation that you can take care of a day in advance. By doing this, your cooking task will be quick and easy - even for very complex recipes. Most fresh fruits with light flesh will brown when that flesh is exposed to oxygen. You can stop the browning by brushing them with lemon or salt water but pineapple juice is recommended because it will not adversely affect the taste. A quick dip is all that is required, so don't worry about leaving it to soak. You should consider drying your tomatoes on your own. Cut Romas tomatoes in lengthwise halves, or slice ripe regular tomatoes into half inch slices for drying. Set them on a rack cut side up and sprinkle lightly with salt. The next step is to put the rack on an old cookie sheet and then place in an oven set at 190 degrees for at least 10 hours. You can store your dried tomatoes in a plastic bag in the freezer. Dried tomatoes could also be put in a jar with fresh herbs and topped up with olive oil. This will be good for up to two weeks, and should be refrigerated during that time. Different varieties of potatoes can have specific uses; you cannot always use one type in lieu of another. There are some potatoes that are waxy and recommended for making boiled potatoes and potato salad but are not recommended for mashed potatoes, french fries or baked potatoes. Russets, and other less dense potatoes, tend to work best for baking, frying and mashing. You can make cooking a pastime, a skill or a profession. Food can be prepared in millions of methods, and the most ideal approach to learning new culinary skills is to solicit advice from the masters in cooking. Therefore, experiment with some of these suggestions whenever you are responsible for preparing a meal.
14:17:58 on 07/24/12
by Webmaster -
Cooking Guide -
Get All Your Cooking Questions Answered Here
You need a few basic fundamentals to be a better cook. The following article will teach you the secrets behind what is involved in being a good cook This informative article is broken down into easy to follow tips that anyone can understand.
Even if a meal looks irresistible, let it sit for a few minutes after it has finished cooking. A lot of people do not wait long enough before serving food. It can be quite tempting to serve meat as soon as you pull it off the grill. But, you will not enjoy the full flavor and texture of your meal if you engage in this practice. Always allow your meat sit for about 5 minutes before eating. If you are left with extra sauce after a meal, find a clean ice cube tray to pour the leftovers into and store the tray in the freezer. When you feel the need to create another meal, you will have them handy to heat up. Nothing to worry about as the sauce will be fine even after it's been sitting in ice cube trays. It is always better to choose fresh ingredients for your recipes instead of dried or frozen ones. You will save plenty of money by buying fresh vegetables and other ingredients, and your food will also taste more flavorful. Dark greens are healthy to eat, but they are a pain to prepare. It can be tedious work to eliminate the tough stems. To turn it into a simple chore, all you need to do is fold the leaf lengthwise, and simply break the stem from the middle. Or you could use a knife and easily cut out the steam from a folded leaf. Either of these techniques will give you a perfect leaf without a stem. Be certain to use only wines that you enjoy as ingredients in your recipes. Because wine will have a big impact on the flavor of your food, a bad wine can result in a bad meal. It is possible to find wines that are meant to be used in cooking. Many popular veggies and herbs have a strong residual odor that can remain on cutting boards well after use. Use permanent ink to mark one end of the cutting board to identify which is which. It is possible to remove strong cooking odors by rubbing stainless steel on your hands. You can use your stainless steel sink or a spoon to quickly remove the odor from your hands. Fruit works especially well on the grill. Consider grilling a skewer of fresh, sliced melons, peaches or other juicy fruits. Cook them until you see grill marks. Serve the grilled fruit on some ice cream or pound cake that has been cooked a few minutes on the grill. Use cooking oil to help prevent sticky messes. Take the measuring spoon, dip it into a lightly flavored oil, like canola, and then pour on the substance to be measured. The foodstuff will easily move from the spoon once measured and cleaning up will be a lot easier. This works for honey and peanut butter too. Impress family and friends when you make a simple sandwich just by spreading the mayonnaise evenly on the entire slice of bread. People often spread the mayonnaise too quickly, resulting in uneven tasting parts. If you spread it evenly, your sandwiches are complete with overall flavor. If you struggle to find time to make dinner every night, do some of your prep work the morning before. You can cut your vegetables, prepare sauces, soup contents an many other things in the evening before you lay down for bed. This creates less stress the next day when you are pressed for time; it also keeps your more prepared when you are ready to throw dinner together. When cooking dishes with a simple flavor, use fresh herbs or seasonings. A more complex dish will still be delicious if you use dried herbs and seasonings. However, using fresh herbs adds a fresher, stronger taste that improves the overall quality of the dish's flavor. Maintaining a small indoor or outdoor herb garden is one easy way to guarantee you always have those fresh herbs when you need them. Figuring out how long meat should be grilled can be tough. A meat thermometer, digital if possible, is always a great idea. This way you can ensure that the inside of the meat is also cooking well. Meat thicker than 1.5 inches should be cooked under a closed grill. You can add a little ketchup to the batter you use to fry foods in. Not only is ketchup good for dipping food into after they're cooked, it's also good when you dip food into it before putting them in breadcrumbs. The ketchup adds a whole new dimension of flavor to fried foods. Before preparing a nice meal for friends and relations, be sure to make a good plan. Save yourself time and trouble by having all your ingredients ready. The day before your meal, get your kitchen into cooking mode and hunt down your favorite utensils, pots and pans. Having everything ready will take some of the stress off and increase the chances of your success. A common error in cooking is over-salting a dish by accident. But never fear, this can be fixed. Cut a peeled potato into a few large chunks, and allow them to simmer in the over-salted sauce or soup for 15 minutes or so. These potatoes will take on some of the extra salt you added. If your dish contains tomatoes, just put in more of them to take away the salty flavor and proceed with cooking until they become ready. One simple tip is to change sauces and spices to get a new flavor. A dramatically different taste can result from using new spices and marinating sauces. A great place to find a variety of lesser-known sauces and spices is at an ethnic food store. The advice that was presented in this article can help even the most inexperienced cooks become cooking geniuses. While some have natural cooking skills, others need advice. Let this article inspire you to improve your own kitchen efforts. How to expand your culinary abilities and skills
Cooking is so easy, a caveman could do it. Are you able to purchase food and follow directions? Do you have the use of basic cooking utensils and equipment? Then, you can cook! To elevate your culinary abilities to the next level, keep reading. You will find a handpicked selection of cooking tips and tricks that are sure to please.
Make it a habit to cook with fresh seasonings and herbs whenever possible. Dried herbs, such as oregano and basil, are suitable for complex dishes with a lot of flavors. Keep in mind that the fresh ones are better and will have a fresher, stronger, and much better taste overall. Small herb gardens can be wonderful to make sure that fresh, natural herbs are always available. Try mixing some flavors into your butter for a bit more complexity with familiar food items like corn and dinner rolls. Set out butter to warm up to room temperature; you can also quickly soften it in the microwave. Then, give it some zing by adding spices, herbs or sauces. Try BBQ, chipotles, lemon juice or honey. Applying some salt on a cutting board when chopping fresh herbs is a good idea. Salt will not only add flavor to your herbs, but it will keep the herbs on the cutting board. To avoid serving a dish that is too salty, do not add extra salt to the meal you are preparing. The salt will stick to the herbs, adding some extra flavor to your dish. In order for herbs and spices to remain fresh and flavorful, they need to be kept in an area that is cool and dim. You should never store herbs and spices above a stove or in any other warm location because that will cause them to lose their flavor, and of course you will be out the money. Many veggies and herbs have a scent that remains on cutting boards even after they are washed. Mark the end of your cutting board with indelible ink to remember which side is which. It's important to keep breakfast foods like waffles and pancakes heated until you are ready to serve them. First, warm your oven to about 300 degrees. While you are cooking, put what is already finished on an oven-safe plate, and stick them in oven to stay warm. If you are going to be making chicken stock, it is best to go big or not at all. When you prepare stock, make a large amount, so it can be frozen for later use. There are a variety of recipes that call for chicken stock, so having it on hand is always a good idea. To store your homemade stock, let it cool, pour it into a freezer bag, and stick it in the freezer. To ensure the freshest fish, go fishing and catch your own. When you catch fish on your own, it can provide a fresh meal and give you that feeling of gratification that comes along with providing for yourself. Fix your pie crust! If you have handled your dough too much it may crack. Sprinkle cold water on the cracks and spread the dough. If the top of the crust cracks, brush some milk on it and sprinkle it with sugar. After it gets baked, the crust will be beautifully glazed and the cracks will be hidden. Utilize other types of timers in separate sections of the house. Timers can be found anywhere, ranging from your watch to your phone, so you probably have one available, and you can always get a simple stopwatch to carry with you. If you already know that the following day is going to filled with a busy schedule, get some of your meal preparations ready the previous evening. If you have a labor intensive meal planned, such as a stir-fry or lasagna, do a little of the preparation work beforehand to lessen the stress a little. It is important to only use wine that you typically drink when you are cooking. Wine that you don't like or haven't tried can ruin the way you feel about the food. Look for wines that are specifically used for cooking. If you use skewers for any of your dishes, be sure to soak skewers made of wood in water for a minimum of a half hour before using them. This will prevent them from burning while you are cooking. If you have issues with food falling off skewers, make it a double. Food is much more stable when you use two skewers parallel from one another instead of one. Bake pie and tart crusts for a longer time than you think is really necessary. Your objective is to cook them past the point of being pale blonde, to the point where they become a golden caramel color. The darker color results when the sugar from the crust has started to caramelize and will have a much sweeter and crisper flavor. If you are making a roast and you need to cook it quickly, do not take out the bone. The roast will get done sooner because the bone will direct the heat right to your roaster. After it is finished, simply avoid the bone as you cut the meat. You can reduce the stress of preparing a large meal for family and friends by doing some of the work well before you begin cooking. Don't leave it all to the last minute, do some of the preparations in advance. Put together everything you'll need, chop veggies, marinade ingredients and get bowls and utensils ready. Quality cutting utensils are a good investment for the kitchen. Sharp knives are less time consuming, easier, and safer to use. Dull blades are the cause of more accidents than sharp blades. The art of cooking can be a hobby, an asset and even a source of income. The only limit to what you can make is your imagination, but you need to learn some of the principles of good cooking from the masters in order to make your perfect dish a reality. The next time it is your turn to shine in the kitchen, remember these tips! How to become a better cook
Cooking is a necessary and valuable skill to have. Eating food that is made from home is yummy and delicious, and it can also save you a lot of money.
When unpacking your groceries, place any unripened fruits in perforated bags. Ethylene gas is produced as a by-product of the ripening process. Placing fruit in a perforated bag allows air circulation in the bag, retaining ethylene gas and keeping the fruit tasting good. Sauteing vegetables is an extremely healthy method of cooking them. Consider adding chicken broth for some added flavor. The broth adds flavor to them, while reducing oil that is usually used for sauteing. This is an easy, delicious way to prepare veggies for you meal. Think about making your own stock for more flavor. Store extra stock in bags in the freezer that are resealable. By freezing stock, you ensure that you have tasty homemade stock ready to add to any dish. By making and having your own stock on hand, you will know it doesn't contain preservatives. It can also be used on other foods, rather than just on meat. You can add it to scrambled eggs or make a tasty snack by sprinkling a bit on some roasted pumpkin seeds. Everyone will love the flavor and ask you for your secret ingredient! When you are cooking for an occasion where you want to impress someone, it is best not to try out a new recipe. You don't want to risk a culinary disaster in front of people you hope to impress. You are certain to gain their respect if you prepare one of your tried-but-true signature dishes. To add additional flavoring to items such as mashed potatoes or soup, use chicken or even beef stock in place of the water. Alternately, you can use bouillon in the water called for in the recipe. Each of these suggestions provides the proper amount of moisture for your food while still giving it a bit of extra flavor. Bundle your fresh herbs together and cut the appropriate amount off with scissors. By using this technique you can chop many herbs in a short amount of time, and they will be much lighter and fluffier, without the wetness that you get when using a knife. Believe it or not, there's quite a bit of variation among different types of potatoes. You can make potato salad with waxy potatoes, but you should use a different kind for fries or mashed potatoes. When making those foods, potatoes which are fluffy, like Russets, are best. Put citrus fruits in the microwave first to get the most out of juicing. Heat your orange, lemon, or other fruits for around ten seconds in the microwave. Roll the fruit across the counter until it cools off before juicing it. Don't start cooking until your preparations are finished. This allows you to economize on the amount of gas or electricity used when cooking, and keeps you from becoming distracted and accidentally getting injured by something like hot oil splashing out of a pan. Prepare everything you need before starting to cook. By doing this, you will avoid the issue of being partially through the recipe and then realizing that you need something. Checking and laying out all of your ingredients at the start doesn't add any extra time to cooking, and it can head off a lot of potential problems further down the line. Discover the benefits of utilizing a variety of colors when you are cooking. Colorful foods are normally more healthy and they are also prettier. You can choose colorful garnishments for your meals, like raw cherry tomatoes, parsley, cilantro, or carrot curls. Be innovative in using color, and watch your food get eaten up quickly. To make sure you know when the food is done, set the timer on the oven, but set a watch timer as well. Using the watch timer ensures that you will always be aware of when your food is ready to take out. If you want to slice meat into thin strips, freeze it partially before bringing it to the cutting board. This technique is especially important if you are making Oriental dishes. Freezing the meat prior to slicing immobilizes the fibers and makes for cleaner, more efficient slices. For even cooking, let the strips of meat thaw completely before you start to cook. Have you found yourself regretting disposing of moldy fruits? Is it possible to save the fruit by cutting the bad part out of it? Unfortunately, there isn't any way to save fruit that has begun to rot. Rid yourself of this fruit. The mold can run deep and can make you sick if eaten. Wait a few minutes before you serve a meal to allow the food to sit for a bit. A lot of people do not wait long enough before serving food. It can be tempting to serve a meal straight off the grill. If you do this, you'll miss out on the meat's full flavor. It's also important that the food simply cools down and rests for awhile for flavor's sake. Give it a few minutes, and it should be ready to go. Use paper towels to blot the moisture from the surface of ground meat before cooking. Blot away the excess moisture on all ground meat before cooking. If you do not blot it away, the moisture will come out when the meat is cooked. The moisture will cook away. This leads to the meat getting steamed, instead of what you want, which is to sear it. Fresh herbs and other kinds of seasonings can help spice up even the simplest dish. Sometimes dried prepacked herbs like oregano and parsley are acceptable because the complexity of a dish allows for the lack of freshness to not be as distinguishable. On the other hand, fresher herbs invoke more vibrant and fresh tastes. You can give your food fresh, homemade herbs by creating your own small herb garden in your yard. When making a stir-fry meal, meat should always be thinly sliced, and cut on the bias. Very often this is difficult to master and takes a lot of time. Take the meat out as soon its gets firm (not frozen), then cut it across the grain at a forty-five degree angle. Do you ever hesitate to toss moldy food? Do you wonder if you can still use the fruit by simply cutting out the part that seems overripe? Unfortunately, there is no healthy way of saving half rotten fruit. They need to be thrown out, due to the fact that mold is much deeper than just skin level and could make you or anyone who eats it very ill. Learning how to prepare homemade food is easy with these helpful tips. You will realize as you cook healthy and tasty food at home that you are saving money and feeling better. Homemade meals also promote healthier eating habits for the entire household. Use these great tips to make delicious, healthy and affordable meals that the whole family will love! Cooking Tips To Simplify Your Meal Planning
A lot of people view cooking as an unwelcome task. In this article, you will find ways to make cooking enjoyable.
Optimize your efforts when making your own chicken stock. If you make a large amount of stock you can freeze it for future use. Homemade chicken stock makes a great base for casseroles, soups, stews, and many other wonderful dishes. Make certain the stock is cooled, and then you can portion it into heavyweight Ziploc freezer bags and place in the freezer. Be sure to soak your wooden skewers in water for at least 30 minutes before using. This can cut down on the chances of the wood becoming burnt and singed during the cooking process. Double up on the skewers per kebab to ensure that nothing falls off of them. Add a little salt to your cutting board whenever you are slicing up some herbs. This gives the herbs a little flavor. Mostly, though, a little salt keeps the herbs from flying off the board. Make sure to avoid over-salting by not adding additional salt directly to what you are preparing. Some of the salt will adhere to the herbs and add flavor to your dish. Always use rubber, nylon or silicone spoons and spatulas when cooking with nonstick cookware. Metal and wood will cause scratching that may loosen flakes of the coating that may end up in your food. These flakes could be very toxic. If you want a healthier diet, use less oil when you cook. Oils and butter are a source of fats. Try cooking sprays that will help your food not to stick and keep it free from fats that contribute little to a healthy lifestyle. To improve your pasta sauce, put aside some of the water used during the cooking of the pasta. Set aside approximately one-fourth cup. While mixing the sauce and pasta, add the pasta water into the mix. Residual starch in the water adds volume and creaminess to the sauce of your choice. Reference your recipe to ensure you have the correct potatoes. Potatoes fall into three categories: waxy, mealy and all-purpose. The crumbly, dry texture of mealy potatoes make them perfect for mashing. The russet is a common type of mealy potato. Yukon gold are considered all-purpose, and suitable for any dish. If you want to boil or steam your potatoes and have them retain their shape, pick up some waxy potatoes. Good varieties are red or white potatoes. If you would like to start cooking more food on your own, take a trip to a local library or bookstore where you can find many cookbooks with recipes you can enjoy making at home. Work your way through a few different recipes, but do not allow yourself to become discouraged during the learning process. Don't overcook your vegetables. They will lose a lot of food value and won't taste good. Pick methods that cook the vegetables quickly so they keep their goodness, or eat them raw. Do you enjoy oysters? Oysters are typically eaten raw with a some lemon juice, but they can be prepared in a number of other ways. Put opened oysters on the shell in your broiler pan and cover with some cream. Cover them with a dash of Parmesan cheese and fresh pepper and broil them until you see bubbles. You can also saute the oysters. To saute oysters, dredge oysters through seasoned flour and place in a pan of hot butter and fry for a couple of minutes until golden brown. You can also keep the oysters inside their shells, then bake them. You place them in a casserole type dish, place a dollop of butter along with fresh breadcrumbs on top of each oyster, then bake them four or five minutes at 425 degrees. Once the butter begins to bubble, enjoy them hot alongside some crusty bread. It is important to only use wine that you typically drink when you are cooking. If you use a wine that you are not familiar with or do not enjoy, you are risking culinary disaster when it comes to the flavor of your food. It is possible to find wines that are meant to be used in cooking. Mushrooms will absorb the water like a sponge. So, in order to clean them, wipe off each mushroom with a clean, wet cloth. If you've made sauce, you should place any that is leftover in an ice tray and freeze it. This way, the next time you want some sauce, all you need to do is saute it in a pan. Don't worry; the sauce will taste delicious after being frozen in an ice cube tray! With what you just read, you can practice what you just read about. Use this advice to assist you in making scrumptious meals! Whatever the reason is for needing to cook, using this advice will make your cooking experience enjoyable. There is no denying that skill is required in order to be a good cook. That being said, a fantastic dish will make all your time and effort worthwhile! Simple Cooking Tips To Make Life Easier
It will take some time and effort to develop this skill, however. It doesn't matter why you want to learn cooking, it feels good to be "in the know". Below are some cooking tips to help you make delicious creations.
Feel confident when serving meals to a new guest or on a special occasion, by sticking to recipes that you have already mastered. Avoid the temptation to try a new dish or ingredient. This is a recipe for a stressful time in the kitchen. By doing this, fruits can stay fresh all through the year. You will also be able to enjoy certain fruits even when they are not in season. To eliminate the stress of cooking, prepare and assemble all the ingredients you need before you start. This will ensure that you don't end up in a mad search for an ingredient while your meal is burning. It can save you the headache from not being prepared and it really doesn't take any more time to do this. Fresh ingredients are better than frozen or dried, regardless of what you cook. Try to use as many fresh ingredients as you can, because they will bring out a lot more flavor in your dish, and they can be a lot less expensive in the long run as well. Take the temperature of cooking meats with a thermometer. There is a temperature that is recommended for the different types of meat that indicates it is safe to eat. Since bacteria is all around us, especially on meat, it is important that you cook your meat thoroughly to kill off this bacteria and therefore prevent you from getting sick. You can warm up tortillas in a few different ways. Most people prefer to heat the tortillas directly on the rack, in a 350 degree oven. You can also use the burner on your gas stove by placing the tortilla above the flame directly on the metal guard. Preparing tortillas in the above manners will lead to tasty tortillas. If you cook using herbs and spices, keep them stored under dark, cool conditions to preserve their freshness and flavor. If your spice collection is exposed to too much heat or light, it will break down the flavors. Keep your spices and herbs in a dark, cool place. When exposed to light and heat, spices will lose their sharpness and flavor. Generally speaking, properly stored herbs and ground spices can keep a good portion of their flavor as long as one calendar year. Whole spices can keep their flavor for up to five years. If spices are stored properly there is a better chance that they will stay fresher for a longer period of time You can reduce your stress level by doing your prep work for an important meal the day or night before the event. Get everything together beforehand; ensure you have all the ingredients, and chop or measure anything you can in advance. When the time comes to make the meal, all you need to do is put it all together and cook it! Apples are a popular ingredient during fall and winter, but unless they are stored properly, they spoil quickly. To keep apples at the peak of perfection, store them in your refrigerator or basement. Sort your apples carefully before storing them, as one bad apple will end up spoiling the rest. It is important to only use wine that you typically drink when you are cooking. If you use a wine that you are not familiar with or do not enjoy, you are risking culinary disaster when it comes to the flavor of your food. It is possible to find wines that are meant to be used in cooking. Mushrooms will absorb the water like a sponge. So, in order to clean them, wipe off each mushroom with a clean, wet cloth. If you've made sauce, you should place any that is leftover in an ice tray and freeze it. This way, the next time you want some sauce, all you need to do is saute it in a pan. Don't worry; the sauce will taste delicious after being frozen in an ice cube tray! If you consider these suggestions, you will be a bit closer to making meals that you can enjoy. Be bold, and try using a variety of spices and sauces. You may even discover a new favorite dish along the way. Utilize the tips in this article, and let your sense of taste guide you to becoming the next best chef. For more tips, visit www.asianonlinerecipes.com Home-Made Bread Recipe
This is a bread ideal for those on an anti-aging diet as it provides all the necessary nutritional requirements.
Ingredients: 570 ml (20 fl oz) tepid water (approximately) 250 g (8 1/2 oz) bran 200 g (7 oz) wheatgerm 1 kg (2 1/4 lb) wholemeal bread flour 3 teaspoon natural yeast 1 teaspoon sugar 1 teaspoon salt 3-10 tablespoons of any, or all of the following: Aniseed seeds Alfalfa seeds Pumpkin seeds Black cumin seeds Poppy seeds Sunflower seeds Method: First, mix all of the dry ingredients in a large bowl. Add the tepid water at intervals and mix very well until the dough does not stick to your fingers. Form into any shape (round, square or long, but without any cracks, otherwise the bread will fall to pieces during cooking). Put on a baking tray and cover with a towel for half an hour in a warm place. Cook in a pre-heated oven at 350F (180C) for up to an hour. Preservation of FoodsFood PreservationNo food could be preserved forever in their natural form. All natural foods are "alive" and, like all of the other living materials, are susceptible to processes of deterioration and decay. These gradual changes in fresh foods are due partly to chemical alterations in the living protoplasm of the food itself, generally catalyzed by the cell enzymes, and partly to changes brought on by minute organisms that get into the foods from external. Meat, fish as well as eggs go putrid, fats go rancid, milk will go sour, fruits turn moldy or ferment, vegetables wilt and rot, cereals end up musty or germinate, mainly because of the action of enzymes. All natural foods are gradually and constantly changing in character as well as composition. Their visual appeal, smell, flavor and food value tend to be gradually being altered. The preservation of food consists in the halting or slowing down of these changes. These changes usually are not always harmful or undesirable. We can see that cream is "ripened" prior to it being churned into butter, that cheese is permitted to "ripen" to produce flavor, and that meat is "hung" so it will be more digestible. However there comes a point in the decay of most foods when they become obnoxious or unsafe perhaps even, in some instances, poisonous. It is certainly advisable to consume fresh foods whenever we can but this is simply not often feasible. Such a huge proportion of the world's inhabitants resides in big towns and cities far from farms and gardens that foodstuff needs to be transported great distances and kept in good condition for long periods. Some countries around the world produce more food compared to what they can consume themselves while just about every country produces surpluses of such foods as fruits, vegetables and eggs at certain seasons of the year. Modern civilization couldn't exist without using preserved foods. But for the use of methods of preservation much of the world's food would be wasted and our diets would be much less varied than they are. Preserved foods usually require less preparation and less cooking than raw fresh food and so have the merit of convenience. Their flavors are frequently altered but there is little loss of food value except for some loss of vitamins, particularly ascorbic acid and the B vitamins. Provided this is realized and fresh foods eaten to make up for this loss there is no harm in the increased use of preserved foods. Kaffir Lime Leaves
Kaffir limes are not true limes. They are from the subspecies of the citrus family and also known as makrut. In South-east Asia, the tree is found easily as they are the native to that part of the world. The rind of the dark green knobbly fruit is sometimes used in Thai cooking while the leaves are the most used. The flesh of the kaffir lime fruit is not edible.
Whenever the leaves are torn or shredded, they release out an unmistakable citrus smell. In Thai cooking, the kaffir lime leaves are used very extensively and also a popular flavoring in Indonesia, Malaysia, Burma and Vietnam cuisines. The leaves are either shredded finely or torn to be used in soups especially the hot and sour soups, and curries. ** Asian Recipes **
04:45:18 on 12/26/11
by Webmaster -
Cooking Guide -
Cooking with Glutinous Rice
Glutinous rice is also known as Khao niao in Thai, gao nep in Vietnamese, and mochi in Japanese. This is also known as sweet or sticky rice because of its texture when cooked. The broad, short grains are an opaque milky-white when raw and become translucent after cooking or steaming, just the opposite of other rice. Glutinous rice has to be soaked for at least 8 and up to 24 hours before being steamed. The cooked grains are tender, slightly sweet and chewy, but not gluey. It is the daily rice in Northeast Thailand, Laos, and parts of Vietnam and Cambodia, where it is squeezed into balls with the fingers and dipped in sauces or used as a scoop to pick up other foods. It is also used in making Asian sweets, snacks, and ceremonial foods, and often is steamed in lotus or banana leaves to make dumplings. Stuffing for dumplings range from braised chestnuts or spiced braised pork to Chinese sausage and dried shrimp, sweet azuki beans, or stewed preserved plums.
** Asian Recipes ** Medium and Short-Grain Rice
Medium-Grain Rice
This is another all-purpose rice. Kernels are shorter and a bit wider than long-grain varieties. This rice type is useful for making rice porridge and cooks up soft with a slightly sticky texture. It is also good as an everyday plain rice. Short-Grain Rice The most popular rice in Korea and Japan, often called sushi rice, is the variety used, mixed with sugar and rice vinegar to make sushi. Kernels are stubby with a plump almost round shape. Short-grain rice is slightly stickier than long-grain, making it easier to eat with chopsticks. When properly cooked it tends to form clumps of soft grains that cling together and have a shiny texture. Short-grain rice is commonly used for making rice porridge (congee) or enjoyed as plain table rice. ** Asian Recipes ** |
 Asian Recipes BlogThe Unrivaled Practical Guide for Asian Cooking |
